or, Nomad Nutters v. Caledonian Nutters: the Batrep
If you're not familiar with the Campaign: Paradiso missions, 102 basically involves trying to get a single model around four out of five objectives scattered across the table. In the right order. Needing to start off where the first model left off if the model gets taken out. In four turns! For more details, see my Tabletop Nation release event report.
First, the table:
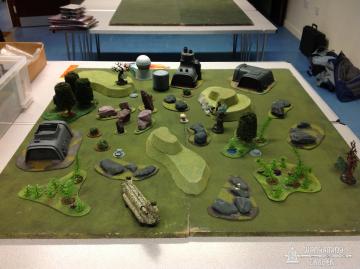
Quite a variety of terrain with hills, buildings, lone trees, four areas of jungle, a downed helicopter and lots of rocks. For the jungles we used some house rules I've been working on which make shooting progressively harder as you fire further.
Army Lists
Nomads:
Combat Group 1 Orders: 10
Interventor » Lieutenant (Hacking Device Plus) SWC:0.5 Cost:26
Clockmaker » Combi Rifle SWC:0.0 Cost:18
Intruder » HMG, Grenades SWC:1.5 Cost:44
Moderator » Combi Rifle SWC:0.0 Cost:9 (Spec Ops with Hacker upgrade, codename: Delia)
Moderator » Combi Rifle SWC:0.0 Cost:9
Moderator » Combi Rifle SWC:0.0 Cost:9
Moderator » Combi Rifle SWC:0.0 Cost:9
Reaktion Zond » HMG, AP Mines SWC:1.0 Cost:28
Moran » Combi Rifle, KrazyKoalas (2) SWC:0.5 Cost:21
Tsyklon » Spitfire, Marker SWC:1.0 Cost:37
Zondbot » SWC:0.0 Cost:3
Zondbot » SWC:0.0 Cost:3
Combat Group 2 Orders: 2
Morlock » Chain Rifle, Smoke Grenade SWC:0.0 Cost:7 (Dogged)
Morlock » Chain Rifle, Smoke Grenade SWC:0.0 Cost:7 (NWI)
Morlock » Chain Rifle, Smoke Grenade SWC:0.0 Cost:7 (+1 ARM)
Morlock » Chain Rifle, Smoke Grenade SWC:0.0 Cost:7 (8--4 MOV)
Morlock » Combi Rifle, Smoke Light SGL SWC:1.0 Cost:16 (X-Visor)
Warcor » Flash Pulse SWC:0.0 Cost:3
Warcor » Flash Pulse SWC:0.0 Cost:3
Salyut Zond » (EVO Repeater) SWC:0.5 Cost:13
Salyut Zond » (Total Reaction) SWC:0.0 Cost:21
Total SWC: 6.0 Total Points: 300
Arguably the best set of Metachemistry rolls I've ever made! Getting X-Visor on the Light Smoke Launcher instead of one of the Chain Rifle models was even better.
Paul's list as best I can remember, it was split into two Combat Groups of ten models.
Combat Group 1 & 2
Caledonian Volunteer » Lieutenant SWC:0.0 Cost:8
Caledonian Volunteer » Rifle SWC:0.0 Cost:8
Caledonian Volunteer » Light ShotgunLight GL SWC:0.5 Cost:11
Caledonian Volunteer » Chain RifleLight Shotgun SWC:0.0 Cost:6
Caledonian Volunteer » HMG SWC:0.5 Cost:20
Caledonian Volunteer » HMG SWC:0.5 Cost:20
Caledonian Volunteer » HMG SWC:0.5 Cost:20
Caledonian Volunteer » Rifle SWC:0.0 Cost:8
Cameronian (Dog-Warrior form) » Chain RifleChain RifleSWC:0.0 Cost:22
Cameronian (Dog-Warrior form) » Chain RifleChain RifleSWC:0.0 Cost:22
Highlander » Chain RifleSmoke Grenade SWC:0.0 Cost:6
Caledonian Volunteer » Chain RifleLight Shotgun SWC:0.0 Cost:6
Traktor Mul » Minesweeper SWC:0.0 Cost:5
Traktor Mul » Minesweeper SWC:0.0 Cost:5
S.A.S. » Boarding SG SWC:0.0 Cost:27
S.A.S. » Chain RifleGrenade SWC:0.0 Cost:23
Warcor » Flash Pulse SWC:0.0 Cost:3
Valerya Gromoz » Hacker (Hacking Device) SWC:0.5 Cost:26
Kaplan Tactical Services (as merc. unit) » Engineer SWC:0.0 Cost:27
Kaplan Tactical Services (as merc. unit) » Engineer SWC:0.0 Cost:27
Total SWC: 2.5 Total Points: 300
We were both using several proxies, I was running the Chimera and Pupniks as extra Morlocks and a Lunokhod Remote as the Salyut reactionbot and some random models as Warcors while Paul was using some Viridian Marines as Kaplans, one of my Zeros as Valerya and a Dogface as the Warcor. He also had a Wulver, Highlander Grey HMG and Wallace standing in as the Volunteer HMGs plus one of my spare bots and a 40mm base standing in for the Traktor Muls.
Deployment & Plans
I won the initiative roll-off, choosing Deployment - so Paul deployed first on the side of my choice and then went first. My choice was mostly down to better fire arcs from my side of the table and wanting to have some idea what Paul's strategy would be.
My main plan was to have the Morlocks roll forwards each turn via coordinated orders to leave a smoke trail that the Tsyklon could walk around behind the smoke with the Interventor searching the objectives through it's Repeater. The reactionbots were then there to punish Paul in his own turn and keep enemy models away from the Tsyklon, Interventor LT and Clockmaker Engineer. The Intruder HMG was there for occasional ARO pot-shot but mostly for gunning down any models with LoF to the Tsyklon.
As backup, the Clockmaker had two Zondbot helpers to either fix the Tsyklon or act as searchers for the Clockmaker. Third and fourth backups came in the form of the Moran Maasai and the HMG reactionbot due to their Repeaters.
Paul had a full Volunteer Link on my left flank including three HMGs plus two 'spare' Volunteers and his to Kaplan Engineers. On the far left were the two baggagebots, Warcor, Valerya Gromoz (Merc Hacker) and a Chain Rifle Volunteer. In the middle were the two Cameronians on on the far right flank two Galwegians. Right in the middle of the table was a camo marker, until he failed the infiltration roll, uncombed and strolled around the corner of the hill to find himself facing the entire Nomad force…
I took the building in my DZ as the main defensive point with the Interventor and Clockmaker hidden behind it, some Moderators as a buffer zone, the baggage reactionbot tucked where it could only be seen from my right flank (i.e. the Galwegians but not the Volunteer Link) and finally on top the HMG reactionbot with a helperbot to fix it in emergencies.
The left flank was held by most of the Morlocks, the Tsyklon and a Warcor.
The right flank was held by the other Warcor, my Spec Ops Moderator Hacker and another Moderator, with the EVO Repeater baggagebot tucked away behind the jungle.
Centrally deployed and positioned with millimetre-accuracy was the camo marker representing my Intruder - largely hidden from the Volunteer hill but with LoF all the way past the right of that hill to the back of the table.
My right flank with reactionbots on the roof - the purple Lunokhod standing in for a baggage reactionbot (or Salyut) was slightly further back and tucked down behind the 'rim' on the roof but wouldn't stay there:

My left flank with Warcor and Spec Ops behind the hill:

The far left corner (Paul's right flank) showing support staff behind the building and a mass of troops behind the hill:

The far right corner showing the Galwegians:

The view from my board edge, note the big yellow turn die and also the exposed SAS on the edge of the hill right in the middle of the table:


Another view from the other side:

As we'd both won our previous games we both started the game able to choose our activation sequence for the objectives. Reading through we worked out that the sequences are public but that they had to be chosen before deployment, so we privately nominated routes, then revealed the routes after deployment was finished. As it turned out, we both chose the same route - from our own sides of the table, the near right objective, near left, central and then far left.
Paul's Turn One
The Galwegians advance in the face of the HMG reactionbot, Combi Rifle reactionbot and Morlock Combi Rifle, one going Dogged to not fall over but then dying, followed by the other doing much the same. Unfortunately they were in different Combat Groups so couldn't coordinate.
The Cameronians coordinate with smoke but one takes a wound from the reactionbot so fails to get his smoke down.

The Volunteer Link advances up behind the brow of the hill and takes down the reactionbot with a crit and a failed save, stopping it from being repaired.

The CRAP SAS stage-centre retreats back around the shoulder of the hill, now that the reactionbot can't turn him into a smear of red paste.
One of the Kaplans searches the first objective (on the second attempt) and heads across Paul's DZ towards the second on the route. Unfortunately the second move of an order brings him round the side of the hill, supposedly safe behind the Cameronian's smoke - and right into the sights of the Intruder's HMG. I'd not planned to reveal the Intruder so early but this was too good to resist - ignoring the low-vis zone he was in the smoke cloud and the Kaplan's Mimetism he scored a hit, only to see the Kaplan save!

This lead to many many orders being spent on the Volunteer Link moving up behind the brow of the hill in attempts to kill the Intruder. The first one results in the Link Leader taking a crit to the face. The Link reforms. The next three or so orders result in lots of misses on both sides before Paul starts running short of Orders and repositions the Link.
Eventually, lack of Orders prompts the Kaplan to try and Move-Dodge into a safer position rather than stay out in the open with an HMG pointing his way, but this time the Intruder strikes true.

Paul's turn ends with him having taken more casualties than I had.
Ian's Turn One
Massed Morlocks pour forward laying down copious amounts of smoke. One of them goes down to AROs from the Volunteer HMGs. The LSGL Morlock is worth every point and SWC, helping to cover the left objective.


The Intruder moves around a little, taking down the two remaining HMG Volunteers one at a time and breaking the Link in the process, then takes out the wounded Cameronian.
The Tsyklon takes advantage of the smoke clouds and scuttles up so that the Interventor can search the first objective, does the same with the second and then goes and hides behind a big rock near the Intruder.
Paul's Turn Two
The remaining Impetuous model, the Cameronian, cancels his Impetuous Order on the grounds that it would be directly into the path of the Intruder's HMG.
The SAS on my left flank advances on the Warcor, dodges a Koala, takes my Spec Ops Delia to Unconscious while charging the Warcor, shakes off a Stun Pistol hit and KOs the Warcor!


Due to my repositioning on the Intruder, the second Kaplan now safely moves up to his fallen comrade and picks up the data, then carries on to the second objective, searches it and moves forwards into the jungle.


The SAS then advances up and uses his Boarding Shotgun to shoot the nearby Moderator in the central woodland, taking out the Intruder with the twin blasts! Fortunately for me, the Tsyklon was half an inch beyond the blast. It's ARO shot misses due to the zero-vis zone plus camo plus cover modifiers.

Ian's Turn Two
More Moarlock Smoke! Followed by some messy Chain Rifle stuff with the SAS.

The Tsyklon gets the bleep away from the Boarding Shotgun SAS, heading for the central objective and plinking a wound off the Cameronian on the way.
The rest of the turn involves moving towards the final objective without getting within 10" of the Cameronian, shooting Volunteers on the way.
The Interventor auto-searches the final objective thanks to the cumulative baggage bonus.
The remaining Morlocks reposition to cover the central objective while the remaining reactionbot moves up to take the place of the dead HMG reactionbot.
Paul's Turn Three
The Cameronian leaps towards the closest Morlock, falls short by a few millimetres and dies to the Chain Rifle ARO which also hits the SAS.

The Kaplan advances forwards and manages to down the reactionbot with a lucky crit from his Combi Rifle!

However there are still too many Chain Rifles etc. to advance safely to the central objective so he retreats slightly and goes prone behind some rocks.

A Volunteer with Chain Rifle takes down the Tsyklon but only on the second attempt. The left SAS kills the Maasai by shooting him in the back, by this point having taken out almost my entire left flank single-handedly.

Ian's Turn Three
I'm perilously close to Retreat, something like five points keeping my forces from running. Paul's SAS rampage has really caused a lot of damage to my points and available Orders, the SAS took down four of the ten Regular models in the main Combat Group.
The remaining Morlocks advance, one of them charging the Kaplan via an Impetuous Order, Irregular Order and the sole Regular Order in that Combat Group (provided by the EVO Repeater baggagebot).
The CR/LSGL Morlock starts sniping Volunteers from long range, trying to get Paul into Retreat even with his two Baggagebots.
On to the main combat group. The helperbot next to the Salyut reactionbot valiantly leaps over the parapet, repairing the Salyut on the way, failing it's Climb roll but making it's ARM roll and landing on it's feet! As nobody in Paul's force can see the central area anymore it rushes across the table towards the downed Tsyklon but then reverses direction at the last minute to take cover due to lack of Orders. That darn SAS!

Paul's Last Turn
Whittling down the Volunteers had taken Paul into Retreat with an extra bonus that one of the Volunteers had been the Lieutenant.
His Kaplan tries to hit the Morlock before running but takes a Shock Ammo crit to the face. Splat.
The LGL Volunteer runs across the sights of the LSGL/Combi Rifle Morlock and takes her down with a grenade!

Other models retreat towards the table edge.
Ian's Last Turn
Purely thanks to the baggage reactionbot being repaired I don't go into Retreat! Otherwise the loss of the LSGL Morlock would have taken me over the edge.
The Morlock that had killed the Kaplan sprinted off towards the remaining Ariadna forces, taking out the LGL Volunteer on the way, getting blinded by Paul's Warcor, shrugging off Stun Pistol hits and being missed by Light Shotgun shells to charge the Chain Rifle Volunteer next to the Tsyklon.
This freed up the helperbot to go round the corner and pick up the data.

With the last Order of the last turn of the game, the Engineer performs the Triangulation objective, out-rolling Valerya's attempt to counter-hack!
The eventual result was 8-3 to me but it didn't feel that lopsided during the game...
Ian