One issue with Epic being a 'dead' game in terms of support from the parent company is that when new units get added to 40k and ported across to Epic it can be hard finding a suitable model.
As a Nurgle player, Blight Drones are a particularly tricky one for this. However, I've found a relatively easy kitbash:
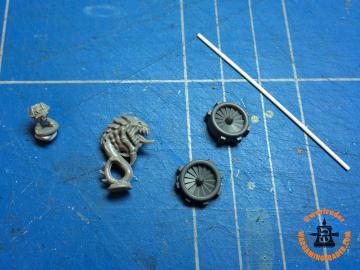
Materials
40k-scale Tyranid Rippers - easy to get hold of as most Nid players will have plenty of spares.
40k-scale SM Drop Pod fans, the ones that are on the underneath of the model - these are trickier to get hold of but as they're not visible on the model once it's on a table you may well find a player who can spare them.
Plasticard rod in assorted diameters.
Some kind of thin metal rod if you want to avoid standard flying bases.
Body
Remove the end of the tail and cut away where the tail looped back on itself. Next, cut away the mouth area of the Ripper. The straight remaining part of the tail will be hanging directly down so use this as a guide for cutting the mouth away at right-angles. The upper edge of the cutaway needs to be smoother out a bit as this will be visible on the final model - it's worth cutting away enough that the old eyes aren't visible any more.


Guns
I used plasticard rod for the guns, using a thicker and shorter piece for the main gun to echo the Forgeworld model, but you could also use whatever small guns you've got lying around in the bits box.


Ducted Fans
The next step is to cut away the flanges on the fans (or not, depending on taste). Then the upper parts of the Ripper's arms need to be cut away to give a flat surface to glue the fans in place.


Interlude
I'm going to try very thin (0.5mm) brass rod for the support, on the grounds that the Drones are very light and if the brass rod gets bent it's cheap and easy to replace. Due to the fragile nature of 0.5mm drill bits, the mounting hole was drilled using a mini bench drill, one of my best ever investments for wargame modelling!

Assembly
With some luck, judgement and potentially a bit more trimming, the fans should neatly fit onto the ledges cut into the upper arms of the Ripper.


The final main stage of assembly was to carve some tapered spikes from the thicker plasticard rod and glue them on under the fans to echo the characteristic spindles. Care must be taken to visually line these up with the fan hubs on the top half or they'll look totally crooked! Note that the little pyramid-shaped lugs that I cut away from the underside of the fans don't appear to line up with the middles of the fans.
Finishing Touches
I added slime in appropriate places with some Vallejo Plastic Putty, which neatly hid any rough transitions where the guns meet the body. Then the tips of the guns were rounded very slightly to remove sharp edges and the larger rod had a small hole drilled in it as it looked too 'blank'. A 1mm drill bit was then used to drill a shallow hole in the middle of the 'forehead' above the guns to match the cyclopean eye on the 40k scale version.


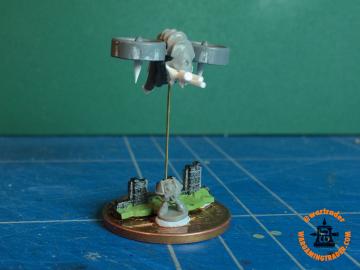
Basing
To stop the Blight Drones blowing around on the table I'm going to go for tuppences for the base, with the bottom of the brass rod being held by some spare bits of ruin walls - which have intentionally been cut so that the highest columns are on the edge, making the whole thing easy to pick up. The Marine probably won't be on the base and is mainly there for scale.
The brass rod is a very slightly loose fit in the holes in Drone and wall so was crimped slightly at the ends with a pair of round-nose pliers.


Number Two
The second Blight Drone has also been completed, using a slightly different Ripper.


For the second one I decided to leave the fan lugs in place and also mounted the fans differently - rather than glue them directly to the model (which makes it a bit narrow) I drilled a hole all the way through the body and glued in some much thicker plasticard rod, then glued the fans to the ends of the rod. This gave a lot more control over the position and angle of each fan. The edges of the hole were then covered in gloop as I'd made the rod slightly too long.
So two down and five to go, but I'm now waiting on a batch of fans to come from Bits and Kits...
Ian