Following on from the conversion blog post, I've now started slapping paint on the Plaguehound conversions.
The first step was to break up the flat plane of the bases, for this I used some fragments of wall for scale and Platicine to add some hillocks.
Then a layer of Vallejo Sandy Paste was added over the top, with the figure temporarily removed from the base - the pinning holes can be seen in the middle of the clear patches:

While this was still wet I put the models back on so that the paste/ground would well up slightly around the feet to emphasis the weight of the model. Superglue was applied the bottom of the feet before placing the model, corresponding with the bare bits of wood. There's a bit of trial and error involved in getting the hang of applying the paste as it dries down thinner than when applied. You don't get to see the texture properly until it's totally dry!


You can see the texture better in this photo of the undercoated models:

I generally start painting a model with the base as it avoids any mistakes screwing up the paint job on the model. Having forgotten to take notes on the colours used on the previous Epic Nurgle models I had to mix something similar. The numbers of colours involved may have got a little silly, but by not mixing everything totally together I could paint in varying colours and shading as I went along.

The result:


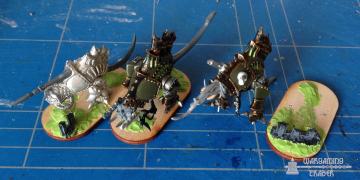
Yesterday and today I then started on the models themselves, concentrating on one model to see if the colour scheme worked. The basic idea was to have some panels in the same Bilious Green used in the rest of the army but to make extensive use of different metallics with washes on the rest of the model. Partly for speed and partly because I love mixing up greasy/oily/yucky wash mixtures. :-)
Base colours:


The yellowish areas where supposed to be the start of a brassy colour but it didn't really work out.
Next came the washes on the metallics. The wash on the bronze areas had more dark brown added, I think it was Vallejo Smoke.


I then painted the chimney tops in Titillating Pink and gave them a thick wash of purple and a little red. The same wash thinned out and with some more red in was used around the base of the head tentacles and to add some basic shading to the tentacles and tail. I also found a better pale gold metallic to use for the brassy areas.


Still to do:
- Wash on the 'brassy' areas.
- Blue eyes at the base of the head tentacles.
- Some green shading on the tentacles and tail.
- some verdigris on the bronze sections and rust on the Boltgun Metal sections.
- Stains on the base.
Given that I'm hoping to use these in a series of games on Saturday, only the eyes and remaining metallic wash will be done before getting the other two models to this state. If there's still some time left I'll add in more detailing/weathering.
Ian