If you're a certain age, you'll have fond (or possibly envious) memories of the Seventies and Eighties Kenner Star Wars toys. I know I was envious of a friend who had the monstrously-large AT-AT. Fast-forward a few decades and AT-ATs and parts of AT-ATs come up pretty regularly on eBay - and every so often seeing some interesting bits for a good price coincides with having some hobby cash...
So back in April I spotted a set of four AT-AT legs going for the princely sum of 99p plus £4.49 postage and put in a bid on the off-chance, thinking that they'd make great support columns for some kind of raised railway. Enter the AT-AT Monorail!
First off, in 28mm scale, these things are HUGE. OK, the Nomad Moderator (minus her arms) is skinny, but she's dwarfed. On the right you can see the original concept, have the lower leg upright with the thigh at an angle and add some kind of strut (in red) that the rail could be supported by and have the train (in green) hanging off that. What would form the rail itself I had no idea.
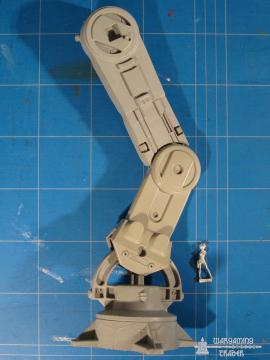

Anyway, on with the plan. These needed to become rigid uprights with no movement at the joints, so after some digging around inside them I worked out a way of bringing the ankle joint down to form a soild joint and then decided to leave off the 'thigh' almost totally, just leaving the knee hinge:

It's still a good 22cm/8.5" high. As most of our buildings are about 3" per storey it'll still easily clear a two storey building.
So, on to conversion/construction details.
The ankle joint first. The large hole at the top is the original pivot. By cutting away some of the plastic and drilling a new hole below it the lower leg fits snugly against the top of the foot. This also required trimming the bottom of the 'flare' flat as well.

The other half of the lower leg had a larger column that filled the original pivot, most of this needed removing as well. This gave a good solid joint that didn't need any glue.
On to the knee. The knee and hip joints on the original model had 'clicky' joints that would move into position against a set of teeth. For the short stub of knee joint that I used, this was stiff enough - especially with the screw done up extra-tight.

The big advantage of using the part of the knee joint that fitted into the thigh is that it ends with a flat square (ish) surface. The two brass tubes ar there to support the rails (more on that later) and fit very snugly into two holes drilled in the top of the leg plus some 3mm foamed PVC plus plasticard glued in place.


As these need to support the weight of rails + train they were glued in very securely with the lower layer of plasticard not drilled out so that the tubes can't sink.
So why tubes, and why the change from the original angled dogs-leg support? This requires some back-tracking.
The original idea involved some form of flexible strip going from support to support and having cable-car-style carriages hanging off the bottom. The problem was what to use for the rail as it would need to have some flex to the sides but not sag. Plus I had nothing suitable for the angled strut so that would've needed scratch-building from foamed PVC and plasticard. Four times.
So I changed direction and dug out some fantastic L-profile edging used for protecting corners of walls under plaster:


This has been sitting in my bits boxes for ages, full of potential but with me lacking a really good idea on what to use it for. Cutting it down to a single row of crossbeams on each side made a perfect angled rail for a monorail to sit on top of, and it's very strong for it's weight. Although all that snipping (there's about two metres of rail all together) didn't do my fingers much good...
The brass tubes now come into their own - by cutting the ends of the L-profile with a slight taper it's possible to add a slight angle where the two ends of rail meet:


It's not as good as a curve would be, but it's still better than a dead straight rail all the way across the table. Also, as I have some mtal rod that fits inside the tubes it's possible to make some L-shaped bits of rod that can hold a short bit of rail that's unsupported at the other end - otherwise there will have to be a column sitting right at the edge of the table.
So how does it look scale-wise?
Compared to two storeys of my foamed PVC 'Russian Doll' buildings:


Compared to two storeys of MAS District Five Apartment:


Other general scale shots:


From a game-play point of view, having the rail within a few inches of a two-storey building is interesting, potentially fast-moving models like TAGs and models like Dog Warriors with Super Jump could get up onto the rail and then use it to get across the table.


It still needs some detailing, for example utility steps up the side, but overall I'm very pleased with how it's coming along.
Ian
Upodate - a couple more photos showing the rail in cross-section and a short piece of rail supported by thick wire: